Today was gorgeous, if not a little chilly during the morning commute. Tomorrow is supposed to get up to 81 degrees!
Thursday, May 29, 2008
A Part of Everyone's Past
It's become my understanding that every man over a certain age has owned a Midget when he was young. At a red light leaving work today, two guys were standing outside of a bar across the street. The one just yelled, "1972." Assuming he was guessing my car's year, I informed him it was a '74. However, it was a good guess. I believe they only made RWA (round wheel arch) Midgets between 1972-74. He continued to say his was also a 1974. Then the light turned green.
Monday, May 26, 2008
2008 Inspection
So I finished up 2007 with little to no problems with the Midget. My inspection was up by the end of April and I had an appointment for the last week of the month. The appointment was at Ragtops and Roadsters in Perkasie. Although I was optimistic, I received the following estimate from the garage:


Exhaust Mount
An exhaust mount metal hanger is separating from the rubber isolator.
$100 to $100
Heater Intake Hose
The fresh air intake hose is cracked letting engine and exhaust fumes enter the cockpit.
$100-$110
Suspension Front: Trunnion
The right front upper trunnion bushing is worn out.
$300-$335
Suspension Rear: Bushings
The rear leaf spring shackle bushings are collapsing and the rubber pads between the leaf spring and rear axle locating plates are distorting out.
$600-$700
Windshield Wiper Blades
The windshield wiper blades are worn out.
$100
Wow.
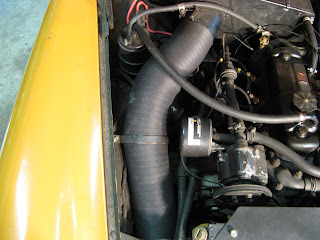
I told them not to do any work and I picked up the car. Right off the bat, I ordered new parts. I replaced all three wiper blades (though only one looked bad) and my dad and I installed a new heater intake hose (the large hose on the left of the second photo below).


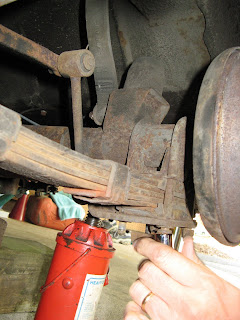
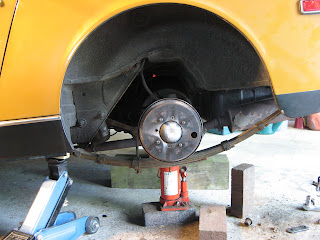
So right there, I saved $130. Then my dad and I set off to replace the rear bushings. I decided to do this first since it was the most costly item on the list. I bought urethane bushings to replace the old rubber ones, as well as new shackle plates, bolts, u-bolts and some nuts and stuff. All of this stuff didn't need to be replaced, but I thought it'd be safer to have it on hand before starting. My Midget has 1/2 elliptical springs for its rear suspension. Disassembly started out pretty promising. We jacked up the car (with two other support structures set up in case any one should fail) and began removing the center, or lowest, section of the spring. This included a metal plate, two seating pads, and the two u-bolts; and disconnecting the shocks. I believe these seating pads are what Ragtops claimed were "distorting out." They were fine. Below are some picture of the disassembly.


Then we proceeded to disassemble the rear and front of the spring. We started with the rear. It was extremely difficult getting the old bushings out of the shackle plate. But through shear, blunt force we got it. Below is a picture of the old bushings followed by a picture of the new ones, partially installed. The old ones were only slightly worn, and I don't think it at all warranted a failed inspection.


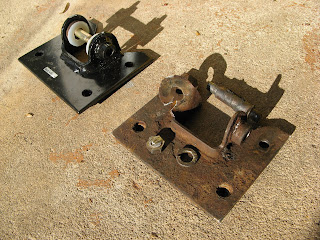
The removal of the front proved to be even more difficult. Our trouble was with trying to remove the bolt from the "eye" of the spring. There's a bolt that goes into one side of a bracket (which attached to bottom of the car), through the "eye" of the leaf (which contains a bushing), and out the other side of the bracket. Well, unbeknownst to us, the bolt was somehow permanently adhered to the inner bushing. So as we unscrewed the bolt, we actually pushed the one side of the bracket away from the center. This is probably confusing, but you might be able to make sense of it by looking at the photos below of the old bracket next to the new one. In short, we basically destroyed the crap out of it.

Once we had everything disassembled, and I had all the new parts, I was anxious to put it all back together. It was difficult, but not as difficult as the tasks we just accomplished. I won't bore you with a play-by-play of the reassembly. But I always love it when my dad says, "Let's put the wheel back on," because it indicates finality. We were done. Below is a picture of one of the final steps: tightening everything onto the u-bolts.

I promptly took it for a (illegal) test drive and I didn't notice anything, out-of-the-norm. Actually, the car ran terrific...as stated in my previous post.
Although the plan initially was to do both of the rear springs, after seeing the unnecessariness of the left side, I decided to not do the right side right away. Instead, I made an appointment with our local mechanic at Grant's to perform inspection. I only had to wait a day, and Billy seemed excited to be able to look over my car. The day I brought it in, he wanted me to come look at the front right trunnion bushing. I did, and he showed me how it was worn out. Admittedly, this had been on the Ragtops list. However, since I was planning on doing it myself anyway, I already had the necessary parts and I dropped them off to him. Antsy to get the thing on the road, I told him to do the work himself. The bill? $65 to replace the bushings. (I paid about $25 for the parts. So $90 total.) Compare that with the $300 to $335 estimate at Ragtops to do the same exact work. Bullocks!
So let's do some more math here. Unfortunately, I ordered way more parts than I really needed. I ordered parts I thought I would need, but things turned out to be in much better shape than we anticipated. But I spent about $250 in parts. And I spent $90 at Grant's. So that's a total of $340. Since the initial estimate was $1500, I saved about $1150. I will not return to Ragtops and Roadsters.
Right now, I'm thoroughly enjoying the car alongside the great weather we've been having.
Thursday, May 15, 2008
Work Completed Part II
All right! Now. As stated in my previous post, things had been running pretty smooth for my little car. It was now Winter of 2006-07. Throughout the winters, I try to drive the Midget for at least a half hour once every 2-3 weeks. I do this so nothing freezes, so gas doesn't clog up in the fuel lines, and so the battery doesn't die or anything. As I always say, a happy car is a car driven often.
So during one of these winter drives, I noticed that my gas pedal came loose from the linkage. As I pressed down on it, it was very wiggly and finally it came loose. Better this than the brake pedal, eh? So I thought this would be an easy enough fix to try on my own. And it was. I simply assessed the situation (broken linkage between accelerator pedal and throttle cable), bought a new pedal and link, and replaced the old parts. Good as new!
So bursting with old love and new confidence, I decided to next tackle the previously mentioned, failing carburetors. Any other amateur mechanic would have no trouble doing this, and most other mechanics might have attempted to rebuild the carbs. I was not comfortable tackling a rebuild, and paying someone to do one cost as much as new carbs, so I opted for the new carbs. At $600 a pair, this was BY FAR the most expensive part I've ordered for this car.
This was quite the adventure. First, I removed the air cleaners so I could get a good view of the carb setup. I then took many many pictures from many different angles so I knew how to put everything back together. I am really glad I took the time to do this.


I then removed all the fuel hoses, springs, the throttle cable, and the choke cable. Then as I unscrewed the carbs themselves, I carefully removed the linkage between them. This linkage will prove to be a bit more difficult when re-assembling. Each carb had gasket residue on the side they went into the intake manifold. (The side we can't see on the photos above). It went carb-gasket-spacer-gasket-heat shield-gasket-intake manifold. The second photo above was taken with one carb removed. That black thing is a spacer. Dad said I should probably replace all these gaskets, which seemed like a real good idea. So I ordered 6 gaskets, some nuts and bolts, and the springs. Aesthetically, I should've replaced the heat shield with a nice new one, but my old one was still serving it's purpose well. I don't need a show car. I proceeded to scrape the gasket residue off the carbs and the heat shield (which took quite awhile), got my dad's approval (he said I did a great job!) and looked toward re-assembling.
If memory serves me correctly, re-assembly went pretty smooth. I was doing all this at my dad's second garage, so when I had everything in I asked Dad to come up to look it over before I started her up. He said it looked fine and we put oil in the top of the carbs and I started the car. I think it took awhile for it to start. When it did start it was running extremely fast. We tried to adjust the carbs (the nuts on the bottom adjust the mixture of gas/air and the idle screws adjust the idle speed). Nothing doing. But I had an appointment already set up with Ragtops and Roadsters in Perkasie for inspection. So I asked them to tune the carbs as well. The appointment was two days after my inspection expired.
Well, this is when things went bad. I got a call from them saying that they couldn't adjust the carbs properly because their was a vacuum leak at the intake manifold- cylinder head connection. A vacuum leak makes it impossible to adjust the mixture since it's pulling in air from somewhere it shouldn't be. However, this didn't need to be addressed for it to pass inspection. I had them do only those things that needed to be done. This included replacing the master brake cylinder (by removing the PDWA valve(?), replacing the seals, bleeding the brakes, and adjusting the rear brakes); fixing my non-working reverse lights (this was apparently a great undertaking, I paid a lot in labor costs); and installing a battery hold down. So after paying over a thousand dollars for inspection and $600 for the carbs, I still had a poor running vehicle. But at least we knew what had to be done. Or so we thought.
So we had to fix this leak at the intake manifold. This, of course!, involved taking off the air cleaners, my new carbs, the heat shield...and everything I just went over. When I got to the intake manifold and removed the bolts, the cause of the air leak was obvious. The ends of the manifold are flanged where the bolts go in, and a good chunk from one these flanges had completely broken off. This certain manifold was not available from Moss Motors or Victoria British. Even if they were, they'd be quite expensive. So my dad and I went over to his cousin's home where he was nice enough to solder the piece back on. He made sure it was flat and level and even. We promptly re-installed it. It was very difficult getting it to fit into the exhaust pipe at the bottom. (Around this time we also installed an exhaust hanger strap so this exhaust pipe wouldn't bounce around). I put back on the shield, gaskets, spacers, carbs and air cleaners. We fired her up and guess what. It still ran like crap. The idle was very fast. We spent a lot of time messing with the mixture adjustments, recruiting help from the internet, one of my manuals, and my Uncle Greg. At some point, my dad borrowed a smoke machine from an acquaintance. Basically, this thing blows white, harmless smoke throughout the entire system so it was easy to spot air leaks. We connected it to the rear exhaust pipe and we didn't really notice anything blatantly apparent. Some smoke was blowing out of some spots that were "breather" holes or spots that were suppose to bring in air. Their was a tad coming from the newly installed intake manifold, but I was convinced that it was fine. A lot more would be coming out if it was problematic.
SO, one day when I was messing around with it, David came over and started looking it over. Him and my dad adjusted the timing because we hadn't yet addressed timing since the new carbs. There was little improvement. He then suggested to try installing the old carbs. I was now a pro at this, so I went ahead and did so. And I'll be darned if the thing didn't run great. So the problem was obviously with the new carbs. David was looking at the new pair and noticed that the butterfly disc (that pivots to let in air) on one of them didn't shut all the way. There was a 1/32" (if not less) gap. He took a screw driver and adjusted the screw so it would shut completely when closed. I removed the old carbs and reinstalled the new ones and boom! The car ran great. My dad and I were ecstatic that we found the problem but aggravated that it was something so simple. You'd think you'd get a properly inspected part for $600.
At this point, I was able to schedule a "drop-in" appointment with Ragtops and Roadsters to fine tune the carbs. I met with Rick and watched him adjust the carbs, and after about 20 minutes, the carbs were tuned. To this day, they still seem to be perfectly balanced. I am glad I asked them to do this. Below is a shot of the new carbs completely installed.

So that's that. We're just about caught up to the present day now. This carburetor fiasco was resolved in May 2007 and I haven't had a "real" problem with the car since then. Last month I was told it wouldn't pass inspection unless some items were taken care of, but I think I'm being taking advantage of. More on that later.
I'm excited today because my dad and I finished some work on one of the rear leaf springs. I took it for a short ride tonight and it ran like a dream. Vroom!
Sunday, May 11, 2008
Work Completed Part I
As stated in my previous post, a lot had to be done to the car before it was roadworthy. Below is a list of the work completed on the car between September 2005 and July 2006.
BRAKES
Being the most important part of the car, Dad suggested that we do the brakes first. The car is equipped with rear drum brakes and front disc brakes. We took apart the rear brakes, replaced the shoes, but needed to get the drums cut. I had a heck of a time finding a shop who had a machine that would accommodate such a small size drum. I finally found someone, Steve's Auto Center, down near Montgomeryville, PA, who did both of them for $30. After the rear was complete, we continued on with the front brakes. We installed new anti-squeal (yeah right!) brake pads, new discs, and I got two caliper repair kits to replace the worn parts of the calipers. It was interesting to see how the older-fashioned drum brakes operate versus the now more common disc brakes. This was probably the first time I actually understood how brakes worked. It gives you a different perspective on things. The car doesn't just magically stop when pushing on the brake pedal.
ODDS and ENDS
We replaced many worn hoses and tubes along the way. We also replaced the spark plugs, condensor, distributor cap, ignition wire set, both front brake hoses, handbrake and throttle cables, air filter, heater valve, and windshield wipers. Some of the more major replacements included the fuel pump ($107!), clutch slave cylinder and clutch master cylinder. I'm running these off in a list, but countless hours were involved with putting this stuff in. Midgets are extremely simple cars, but its tight quarters can make getting to things very difficult. My dad cursed the Brits several times along the way for manufacturing things the way they did. Working on parts that were 30+ years old didn't help either.
VROOM!
It was around this time that we started the engine for the first time. It was January 2006, I believe. I had been working on it with my uncle and my dad for a good part of the day, and that evening my band held a practice. It was during the practice that they got it running (after they realized we had screwed up something stupid...something was in backwards or something). Unfortunately, I wasn't present for the first successful firing.
CHANGING GEARS
At this point, obviously, the car hadn't been on the road. So shortly after we got it running, we attempted to take a drive. Unfortunately, the clutch was stuck. After sitting for 18 years, the pressure plate had become stuck to the disc. So with my dad in the driver's seat, we drove it up and down Clover Lane in an extremely jerky effort to break it free. I believe my dad had successfully broke the clutch free in this fashion years ago with his Porsche 914. Now, you might not believe me, but looking back on my life, this may have been one of the happiest (if not the happiest) day of my life. The moment the clutch broke free, my dad and I celebrated like no other time before. I was beyond excited. My car was now mechanically (if not officially) roadworthy. Thanks to my friend, Greg, who helped teach me to drive stick shift, I hopped into the driver's seat and drove it for the first time. Since the car was not yet insured, I only drove it up and down Clover Lane. But I must've done this a hundred times. I took my brother Steve and my mom up and back for rides as well. The neighbors probably thought I was crazy.
LEGALITIES
I got it insured. And now it needed to pass inspection. I made an appointment with Maiden England down in Bally, PA. I asked him to do an overall tune-up as well. He performed the following tasks: drained and refilled the transmission, differential, and engine; bled the brakes and adjusted the rear brakes; greased the chassis; cleaned and adjusted the carbs; changed hose on the heater core; changed the fuel filter; replaced the ignition wire; and adjusted the points and valves. $430 later, I was cruising like there was no tomorrow.
AESTHETICS
To date, I've done very little to make the Midget any more pretty. But at this point I had the wheels powder coated (a gift from my dad), put MG emblems on the wheels, and took off the PO's fog lights. I also polished the chrome and took off the tacky GB stickers. Sometime before all this, I had bought a new set of tires as well (4 tires for only $120!).
GETTING THE KINKS OUT
The first summer I owned the Midget turned out to be somewhat frustrating. It was GREAT when it was driveable, but there were some things that still needed to be taken care of. The first was the fuel tank. A few times, as I was driving it, the car would just stop running. It never left me stranded because it eventually started back up. But my dad figured there was some kind of blockage in the fuel lines. Since fuel had been sitting in the tank for so long, we were probably getting bits of goo mixed in with the fuel. So, we dropped the fuel tank, and had it cleaned and sealed, inside and out. I had this done at Lehigh Services, Inc in Macungie, PA. We got it back, reinstalled it, and also replaced the fuel sending unit, which pushes the fuel to the front of the car.
The next thing that went was the clutch. I was at my aunt's house for Easter. Since this was the first time my family saw the Midget, I took a few of them for rides. During one ride, the clutch gave out. Though it was embarrassing, I was more upset than anything else. My dad drove it home by double-clutching. I made another appointment with Maiden England and my dad was able to get it down there with no issues. I was unaware of this at the time, but one has to remove the engine completely in order to get to the clutch to replace it. So it was a little more expensive than I anticipated. When I picked it up, my friend, whom I was following, noticed my right headlight was out. I noticed that my speedometer wasn't working either. We turned around and the mechanic was unable to fix the speedometer (which he thought was a loose cable) and said I probably just need a new bulb for the light. We ended up buying and installing a new speedo cable (which "kind of" works today). I also bought two new bulbs for the headlight only to find that the right light still didn't work. After scratching our heads for a long time, we finally found a loose cable near the grill. We plugged it in, and the light worked once again. This was probably yanked out when the engine had been pulled.
I forget why we decided to replace it (maybe it was running hot), but we next replaced the water pump. I remember having to remove several other parts (including the radiator, which was a huge pain) to get at it. But like many of the other parts we replaced, it's now done and it won't have to be replaced for a very long time.
The engine had been occasionally missing, so I wanted to get it professionally tuned up. I refused to go to Maiden England again, so I took down to Ragtops and Roadsters in Perkasie, PA. They adjusted the plugs, ignition gap, timing, carb mixuture, idle speed and tightened the oil filter. They said I should look into getting the carbs rebuilt or replaced since they were old and sticking.
I WANT TO CD
I've been driving the Midget to work (in Bethlehem) once or twice a week and I needed some tunes. The car still had the original radio installed and it actually worked. Though not well. I bought an inexpensive, but nice Kenwood receiver and bought 2 very cheap speakers. They had to fit behind the radio grille so they were quite small (2.5" I think) but they were better than the original stock single speaker. We had to rig up a mounting system to accommodate the two speakers. After a day's worth of work, and lots of help from Dad, Steve, Greg, and the Internet, the stereo was in. I wanted to avoid wiring speakers to different parts of the cockpit, but looking back, I should've at least sprung for some higher quality speakers.
THE END IS THE BEGINNING IS THE END
This concludes the major work done to the car to get her in a pretty respectable state. My records show that I went from July 2006 to February 2007 without doing any mechanical work. So things were going pretty smooth. This seems like a good spot to end this post. From this point forward, I became much more involved with the repairs. Up until now, I mainly held the light so my dad could see and I retrieved tools, held parts in place, and helped out as needed. I wish I would've been more proactive in doing things with my own hands...but at least I was always present and asked a lot of questions along the way. My next post will begin with one of the first projects I tackled by myself.

My dad helped me (or should I say I helped him) throughout the Christmas season of 2005.

The Midget up on jacks, as it was for the vast majority of the time during the first several months.
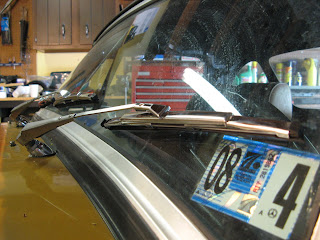
 Here's the interior. Since this photo was taken, I've replaced the stock radio with a CD player, replaced the shifter boot with a new one (thanks Steve!), replaced the black wipers with stainless steel ones, and reattached the ashtray to the center column (which is a handy coin holder). As the sticker indicates, it hasn't been inspected since 1987!
It's finally on the road! What a slick-looking car.
Saturday, May 3, 2008
My First Post
Hi. My name is Scott. And this is a blog about my MG Midget. For this initial post, I think it'd be appropriate if I told you little bit about the events leading up to the purchase of my MG Midget.
I first recognized my love for Midgets when I was in my teens. I never had much interest at all in cars. In fact, I was very disinterested in them. They were merrily something to get me from Point A to Point B and I even waited a whole year after I was 16 to get my license. But anyway, I accompanied my dad to a community car show one year and there was an MG Midget. As it was the first time I've ever seen one, I immediately fell in love.
Why do I love these old, impractical, relatively slow cars? Well. They're very small. They're easy to maneuver in parking lots and on streets. I'm disgusted with the number of SUVs I see on the roads these days. I won't get into it now, but it's quite ridiculous. Secondly, Midgets have a very unassuming appearance. I get smiles and waves anytime I take it out. It just seems to make people happy. Third, they are simple in function and design. Under the hood and in the cockpit, it possesses only the essentials. Nothing more. Nothing less. The exterior's lines are straight, clean, and simple. My favorite view is from the front. The two round headlights perfectly complement the subtle smile of the grill. At its core, it is a classic and simple sports car.
As the years went by, I still hadn't much interest in cars, but I would periodically get MG books for christmas or look up pictures of the mighty Midget on the Internet. I was driving a Plymouth Sundance Duster during my late teens and early twenties which I shared with my brother. This was an awesome car. I don't think I realized how great it was until my brother and I had to start using different modes of transportation from one another. I was out at college for an extra semester, and he was home. Thus, my parents bought a 1991 Chevy Lumina for $800 at an auction, and I ended up eventually using this car instead of the Duster (at my own decision). I absolutely HATED this car. It was big. It drove like a boat. And the left turn signal often didn't work. I hated it.
It was during this time that I realized how much of an impact what I drove had on me. As a result, I started keeping an eye out for used cars. Since my dream car at the time, a new Mini Cooper S, was way out of my price range, I thought I could attain the same thrill from owning a MG Midget, at the fraction of the cost. So during the summer of 2005, I actively looked for one, mainly through the automotive classifieds. I stumbled upon a few that summer. There was a rubber-bumper Midget in red that I went to check out with my dad. Since I didn't yet know how to drive stick, my dad took me for a test drive in it. This was the first time I sat in one. I couldn't believe how small the cockpit was. I LOVED IT! I remembered my dad saying the brakes were very weak, having to push them all the way to the floor to get the thing to stop. I sat in the driver seat to make sure I would fit. I did. However, I wasn't crazy about the rubber bumpers, the color, and I thought they were asking too much for it. Although the seller (a fellow about my age) was very nice and seemed anxious to get rid of it, I passed on the car.
I happened across a few other Midgets that summer. They were either too rusty or too expensive.
Then one day I saw another one for sale in the paper. I asked my dad to call (since he is more knowledgeable about cars and would know what to ask). He said it was a yellowish color; it sported the desirable chrome bumpers AND rear wheel arches; but that it didn't run. We went to look at it anyway that afternoon. We drove up to Emmaus and as soon as we saw it sitting in the driveway I had a really good feeling about it. I think I commented to my dad how the color was nothing that I imagined it to be and that I thought the car looked awesome. We talked with the seller for a bit and looked over the car. The body was in great shape (with two minor surface rust spots). The interior was worn but intact. The car had been sitting for 18 years in a temperature-controlled garage and the seller never took the measures to bring it back to life. My dad checked to make sure the engine turned so we knew it wouldn't have to be rebuilt. Dad informed me that it would take a little work to get this baby running, but I've been told you should try to find a car with a good body over a car with good mechanicals. Way too many of these cars have rusted away over the years. When the seller went inside to get something, I told my dad that this was the one. $2,000 seemed extremely reasonable and I knew if I didn't buy it then, it would be sold before the end of the day. So I gave the seller a $100 deposit, until I could arrange to have it towed home.
We asked David, my mom's cousin, if he would transport my new car home with his flatbed trailer. I was beyond excited during the title transfer and the drive home. I kept looking back at the car to make sure it wouldn't fall off.
We got it home, and I was so eager to get started. My dad and I started looking at some spare parts the seller gave us, none of which I could identify. In my next post, I will get into more of what we did to the car from September 2005 to the present day.

My brother's and my 1994 Plymouth Sundance Duster.

My acquired 1991 Chevrolet Lumina.

My first ride in a MG Midget. This is a rubber-bumper Midget from the late 70s.

This one I saw at the Das Awkscht Fescht at the Car Carrol. It was a '75 Midget with a great stereo setup. They were asking around $5,800 which was WAY too much.

The winner. Even with the missing grille, the tacky stickers, the questionable square fog lamps, and the tire lettering it doesn't even compare to the two other Midgets pictured.
Subscribe to:
Posts (Atom)